Showing posts with label blood ravens. Show all posts

Wednesday, January 26, 2011

97 - Blood Ravens Tactical Squad "Contemptus"


Here we have the ten marines who make up my first tactical squad, "Contemptus." The Sergeant is armed with a Power Fist and the two specialists are equipped with a multi-melter and a flamer. The squad will also be mounted in a Rhino (which I have yet to paint). I have a 2nd tactical squad which I've also painted up (to be named "Fortis"). I'll put up a post with them next.

Squad Contemptus is a mixture of Black Reach and Tactical Squad kits. The Black Reach marines are easily distinguished by the molded Tactical Squad arrow on their shoulder pads. I've yet to apply water-slide transfers on my Blood Ravens, mostly out of sheer laziness. Usually, after I finish off a miniature, I just want to move on to the next one and so I neglect things like transfers, final highlights and even decorative bases at times.

At some point, I'm going to dive into painting a vehicle. I have all of the tools ready and at my disposal. I picked up a cheap airbrush from Michaels which I want to try on one of the vehicles. I'll probably also try using a standard spray can as well as manually brushing on the basecoat just to see which technique suits me best.

Leia Mais…

Saturday, January 22, 2011

96 - Blood Ravens Scout Snipers


I told you I had quite a backlog of painted miniatures. In this post, I give you 2 Scout Snipers. I had originally painted up a single standard Scout about a year ago, but after getting my hands on the Sniper Scout bits, I decided to go with a full 5 man Sniper Team for my Scouts. I debated whether to turn one of them into a Heavy Bolter support guy, but I liked the look of the Sniper Scouts so much I decided to go 100% sniper rifles.

The Scout depicted to the left has some minor conversion. His legs are from one of the Scouts mounted on the Land Speeder Storm kit. I added a bit of cork under his right leg to give the impression he's just emerged from a sniper's nest hidden amongst rocky ground. His cloak is also from another kit - some Warhammer Fantasy Battle kit that I can't quite remember right now. It's hard to see with the angle of the photograph but the fact that it doesn't cover his shoulder pads should tell you it's not from the original Scout Sniper kit.

The Scout to the right is pretty much standard Sniper Scout parts.

Alright, up next should be the remainder of the Blood Ravens miniatures I painted up during my hiatus - mostly Tactical Squad Marines. I managed to complete both of my 10 man Tactical Squads during the hiatus.

Leia Mais…

Thursday, January 20, 2011

95 - Blood Ravens Sternguard


Here are 2 more members of my planned 5 man Sternguard Veterans Squad. The veteran to the left is armed with the special bolter which fires 4 different types of ammunition that the unit gets as their default weapon. He's had some very minor conversions done to him; for instance, his right shoulder pad is from the Command Squad kit and his bolter is from the Black Templars kit with a standard storm bolter box magazine glued to its bottom. Again, paint-wise, he's fairly standard for me. I like how he looks suitably decorated - it definitely gives him a veteran feel without going overboard with the embellishments.

The veteran to the right wields the Heavy Bolter. I actually think he turned out really well. I love his pose (which was achieved by using a pair of legs from the new Blood Angels Death Company kit). He certainly has a sense of purposeful motion about him. His helmet is also from the Death Company kit. While not everything Blood Angels would fit well as Blood Ravens conversions, with some strategic scraping off of mismatched iconograpy and choosing of parts, there are enough in the new Blood Angels plastic kits to really allow a modestly-skilled modeler like me the ability to customize a standard Codex Astartes chapter like the Ravens.

Leia Mais…

Wednesday, January 19, 2011

94 - Blood Ravens Company Command Squad


As promised, here are 2 members of my Company Command Squad - the Champion and the Meltagunner. I'm pretty proud with the way they turned out. The whites are much cleaner and opaque than I'd been able to achieve in the past and the overall models are just neater despite all the little embellishments they have. I especially like the Meltagunner. His pose is a bit too static in hindsight, but I'm pleased with how the paintjob turned out. Both miniatures are mounted on torn cork to simulate rocky outcrops. Gameplay-wise, I'm not sure how their elevated stature would impact them (negatively or positively - probably both in equal measure), but I felt for models that were meant to represent my HQ choice, they should stand out from the rank-and-file troops. Not much was added to the miniatures in terms of simple conversions, although I did give the Champion the Power Mace from the Black Templars upgrade kit to replace the Power Sword that came with the Company Command Squad kit.

Oddly enough, I've yet to tackle the Captain for the squad despite the fact that he's probably one of the first miniatures I ever bought (he comes from the Assault on Black Reach starter set). I think I'm still a bit intimidated by the amount of fine detail in his design; couple that with the fact that he's supposed to be the centerpiece to my Blood Ravens army and I suspect it'll probably be a while longer before I build up the courage to actually give him a whirl.

Alright, my next post will highlight 2 Sternguard Veterans that I painted in the past year. Stay tuned and thanks!

P.S. Quick shout-out to Bell of Lost Souls for kindly re-adding me to their blog alliance after my year long hiatus. You guys rock!

Leia Mais…

Tuesday, January 18, 2011

93 - Blood Ravens Assault Squad


Next up - 4 members of my planned 10 man Assault Squad. Standard paint scheme for my Blood Ravens. At first, I wanted to pin them to their bases with transparent flight stands, but after assembling about 5 of them, I realized I had completely forgotten to do that. Such is life. Instead, you'll have to imagine that these Assault Marines had just touched down at their destination and are about to wade into close-combat with the enemy.

The Sergeant is armed with a Lightning Claw and Combat Shield primarily because I wanted to paint a Lightning Claw (none of my other Blood Ravens are kitted out with Lightning Claws). A Power Fist might've been a more effective kit, but what the heck.

Up next for tomorrow - the first 2 members of my Company Command Squad!


Leia Mais…

Monday, January 17, 2011

92 - Don't Call It A Comeback!


Or do, if you'd like. Well, that was quite a long pause in-between posts. Let me re-introduce myself:

At one time, I maintained this blog 0n the hobby of miniature wargaming figures on a fairly consistent basis. That was about a year ago. Then I stopped because I thought applying to PhD programs in English Literature would be a good idea. I was wrong (and not because I didn't get into any - well, at least not entirely). Turns out, when your heart isn't into something which takes as much effort and dedication to get right, you usually end up wasting about a year of your life chasing shadows. So, instead, I've decided to follow where my heart was trying to tell me all these years and commit to becoming a high school English teacher. Teaching, really, is what I want to do. Researching and writing journal articles about obscure poets and poems was really the last thing I wanted to do. Thus, here I am, with my own life back and with the time to enjoy life in all its facets.

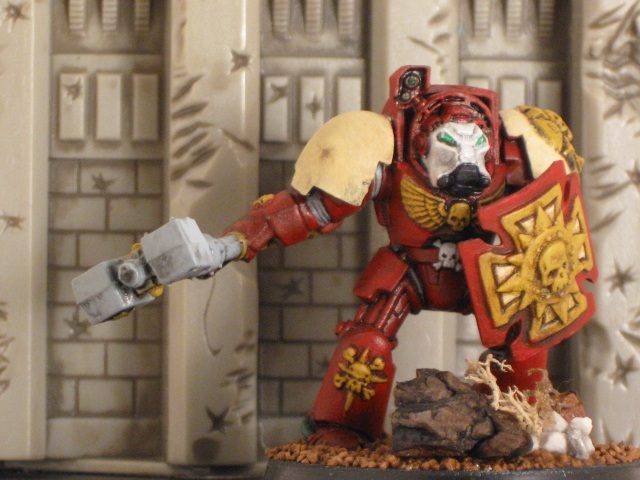
So, let's get right to it, shall we? Remember that project I was undertaking before this hiatus? The one about painting 365 miniatures in 365 days? Well, I obviously fell on my face with that one, but I wasn't completely dormant over this last year. I actually did get quite a bit painted up and my postings for the foreseeable future will be an attempt at catching you up on that. First up - two Blood Ravens Assault Terminators armed with Thunder Hammers and Storm Shields. Nothing fancy, but I definitely do think they are a step above what I had previously been doing. The past year has actually seen my abilities refined - not necessarily advanced, but most certainly perfected at my level of competency. There's really not much to say about these two aside from the interesting fact that the ink I used to shade them with was NOT GW's Citadel Washes (although I do love them). Instead, I used Liquitex inks (Carbon Black, Transparent Raw Sienna, and Transparent Burnt Umber) which I diluted with Flow Aid in order to achieve a consistency similar to GW's line of washes. The reason behind this was purely economical - the Liquitex inks come in almost triple the quantity for about a dollar more (if you don't count the judicious use of Michael's coupons) and all that's needed to wash an entire a figure are a drop or two of the inks to five or ten parts Flow Aid.

Oh, and the war-torn wall behind these fellows comes from a set of Heroscape scenery I purchased cheaply from eBay.

Well, hopefully this blog is up and running again. Stay tuned for more of my triumphant return!

Leia Mais…

Friday, March 5, 2010

85 - Blood Ravens Tactical Squad Fortis Meltagunner


Day 13, miniature 11; still 2 miniatures behind. Hmm, I sense more skeletons in the very near future. No, just kidding.

Say hello to the meltagunner of Tactical Squad Fortis of the Blood Ravens...er...huh, apparently, I haven't considered which company my Blood Ravens are a part of. I'll have to do some research into this. I know they can't be the 1st Company as that's usually the all Terminator veteran company in a standard Astartes force organization chart. They can't be the 2nd Company because they already have a published history (Dawn of War 2). They can't be the 5th Company because according to Blood Ravens fluff, that's the "Fated Fifth," a company that returned from the warp somehow...tainted. They can't be the 10th Company because that's the all Scout company. So that leaves 3rd, 4th, and Sixth to Ninth Companies. Anyone know if according to the Codex Astartes, those remaining companies have any prescribed specialities? In other words, are any of them primarily mechanized companies or jump assault companies or drop pod companies, etc.?

Well, there's really nothing all that special with this particular model. He's the 14th Blood Raven I've painted up, so it's getting rather mechanical painting these guys. At some point I'm going to either buy some blank water transfer paper or learn how to free-hand the Blood Ravens chapter logo onto their shoulder pads though.

Okay, so what's next? I've got a converted Gunnery Sergeant Harker I'd really like to paint but considering that I'm already 2 miniatures behind, I'm probably better off focusing on painting up more rank and file troops. I've still got about 30 more Cadian Shock Troopers to do so I just might go that route and try to pull back to even in my miniature count. But I've also got some converted Ork Kommandos that have calling to me from their place on the shelf. Hmm, well, we'll see.

Leia Mais…

Monday, February 22, 2010

75 - Blood Ravens Tactical Squad Fortis


Day 2 of the project is done! Here are 5 Blood Ravens Space Marines which had been sitting at my painting station, mostly in need of an ink wash and minor highlighting. I'll be counting them as 1 miniature as I did the Orkz from yesterday. I've decided to name this Tactical Squad - the first of two - Fortis, which is Latin for "strength." I have 3 more Blood Ravens to fully paint up before Fortis is complete - the Sergeant, Meltagunner, and Multi-Melta Operator. Fortis will also be mounted in a Rhino, so that's gotta get painted up too.

Previously, I had major issues shading the red armor with ink washes. I'd been using Badab Black and the results were less than pleasant. The Badab Black darkened the armor way too much, forcing me to spend extra time bringing the Red back up. It was a real pain. But then I read an article in White Dwarf (not sure which issue, but it was a current one, I believe) on how to paint, shade, and highlight Red which suggested using either Thrakka Green or Asurmen Blue to shade Red, depending on the effect you're going after. So I decided to use Thrakka Green on this batch of Marines, and I must say, I'm pretty happy with the results. The shadows aren't as deep as if I'd done them with Badab Black, but the Thrakka Green is definitely neater while still providing a decent level of shading. I selected Thrakka Green over Asurmen Blue because the Blood Ravens already have elements of Green in their paint scheme, so I figured it'd tie in better.

To the right is a more detailed look at 3 of the Blood Ravens from this batch. You'll notice the Marine to the far right has been given a Black Templar boltgun. I wanted to add some diversity to my Marines and seeing as how the Black Templar arms were so damn cool, I knew I had to include them. All it took was some careful scraping off of the Black Templar icon on the boltgun and it was good to go.

Okay, as I wrote up top, Day 2 has been successfully completed. Tomorrow though begins the real challenge as I have to paint up a brand new miniature from the bottom up for it to count towards this project. I haven't quite figured out which one of my hundreds of unpainted models to pick yet, but depending on how much time and energy I have left tomorrow after work and family obligations, I might either go with a rank and file model or a more elaborate character model.

Note: again, I've had to post these miniatures past midnight my time due to time constraints, but rest assured, they were finished prior to the midnight hour tolling! I'm very likely going to have to follow this sort of schedule for most of my miniatures in this project.

Leia Mais…

Thursday, August 27, 2009

58 - Update on TOEMP Challenge #2 Entry


Here I present to you my official Challenge #2 submission. Not a big difference from the original entry in post 56, but a bit more characterful, in my opinion.

Since I had 2 days or so until the end of the official deadline (August 27), I decided to revisit my Blood Ravens Terminators. I was always disappointed with how uniform the Black Reach Terminators looked - pretty much every Termie was armed in exactly the same way and posed in exactly the same position. Due to this, the painting process for these 4 models was a bit boring. (Add in the sheer drudgery of trying to achieve a decent level of coverage of red paint over black primer, and the monotony became almost intolerable.) So, I rummaged through my bits boxes and stumbled upon some Chaos Terminator doodads that I thought might just do the trick of personalizing my Terminators just a little bit. I also took the time to go over some rough spots with more paint (primarily the helmets to achieve a brighter white than I had earlier) as well as give the heraldic shields near their left shoulder pads a Devlan Mud wash to add a little bit of depth. (Thanks, Gregory, for the catch and the tip on that one!)

Some might say that adding Chaos bits to Loyalist Marines goes against the fluff, and I can understand that point of view. However, if one reads the Blood Ravens fluff closely, one will notice that this particular Chapter of Space Marines has very close and ominous ties to the forces of Chaos. For instance, out of all of the Space Marine Chapters, the Blood Ravens are the ones most at ease with employing psykers - they have a higher percentage of Librarians within their ranks than other Chapters. There is also the 5th Company of the Blood Ravens (known as the "Fated Fifth") which disappeared into the Warp, the rumor being that they were corrupted by a renegade Librarian within their midsts. Now, the current members of the 5th Company wear badges of penitence and shame upon their armor, although the reasons for doing so are never spoken of. Finally, there are many hinted at connections between the Blood Ravens and corrupted legions such as the Word Bearers and the Thousand Sons. Thus, I think it wouldn't be out of the ordinary for the Blood Ravens to festoon their armor with "Chaos-y" regalia - not out of an attempt at becoming Chaos, but more due to the Chapter's willingness to dance with the dark side. Plus, at the end of the day, the spikes I added to the Terminators are just spikes, right? I purposefully avoided anything that might be too Chaos-influenced (like symbols of the Four Powers or the Chaos Undivided star or trophies that used actual Space Marine heads or body parts, etc.). Why would it be considered beyond the pale for elite fighters such as these to decorate themselves with icons that might strike fear into the hearts of their enemies?

Because of this new submission, my Points Total for Challenge #2 is now:

Foot Sloggers - 10 points
Lenses/ Eyes - 5 Points
Meet Deadline - 2 points

For a total of 17 points.

As usual, click here for more pics.

UPDATE: I was just informed by 73rd that models on 40mm bases count as 2 pts. per model, so the total points for my Blood Ravens Terminators just went up by 5! Woot! The original post was edited to reflect this change.

Leia Mais…

Tuesday, August 25, 2009

57 - TOEMP Challenge #2 Is Complete!


5 Blood Ravens Terminators coming right atcha! Some definite problems with them, but overall, I'm satisfied, not least because I managed to beat the deadline by about 2 days. In all honesty, I have to admit that I started to lose interest in painting up these Terminators about a day ago and was kind of just rushing through the finishing touches. Thus, they have plenty of issues I'm unhappy with - for instance, some of their helmets aren't as uniformly white as I'd like; I didn't really feel like properly bringing the Opaque Red basecoat back up after the wash step; and I hardly did any highlighting at all.

The most glaring things missing from the models are the freehand Chapter symbols and heraldic markings I originally wanted to paint onto the right shoulder pads and the small shields near the left shoulder pads. I did try to freehand the Blood Ravens symbol onto one shoulder pad, but again, the result was so horrifying, I had to get rid of it. I had to admit to myself that at this point in my hobby-life, I have zero ability to freehand. I can barely draw a circle with pencil on a blank piece of paper as it is. I'm going to have to practice freehanding more before giving it another go; in the meantime, I'm going to buy me some water transfer paper and just go with decals.

One more thing - I keep telling myself that when I'm painting a model that's primarily red, I will not prime it in Black. Unfortunately, I forgot my own reminder with these terminators. I think part of the loss of interest I experienced with these models was how frustrating it was getting proper coverage with red acrylic paint over a black undercoat. I think 75% of my time painting these models involved layer after layer of red basecoating. Very boring. Very monotonous. I probably won't prime in white when painting Blood Ravens since their red is more on the dark end of the spectrum. I think I'll experiment with just priming them red from the get-go and see how that works.

Okay, let's tally up the points for these fellows:

5 Foot Sloggers = 5 points
5 Lenses/ Eyes = 5 points
Meeting Deadline = 1 point
Beating Deadline by at least 24 hours = 2 points

So 13 total points (unless I give the freehanding another try hehe). Can't wait for Challenge #3!

Click here for more pics of the Terminators.

Leia Mais…

Friday, August 21, 2009

56 - TOEMP Challenge #2 WIP (Blood Ravens Terminators)


Since we received our details for the second challenge 3 days ago, I've progressed rather nicely on my Terminator Squad. The pic on the left shows 2 Terminators from the 5 man squad practically nearing completion. The Termie on the far left is more advanced than the Termie on the right, but both are almost done. A few more basecoats, washes, highlights, and then fancying up the bases a bit are all that's left, really. I have to say, the Terminators have been a bit monotonous. I dunno. Their poses aren't all that different, their battlegear are almost identical, etc. etc. Even standard Space Marines have more customizability. Of course, these are the Termies from the Black Reach set, so lack of customization should be expected. And, yes, I could've performed a few conversions on them myself (such as cut a Termie or two in half and pose their torsos in a different direction), but I was being lazy. I do want to try freehanding the Blood Ravens Chapter logo onto their left shoulder pads and some heraldry onto the small shields near their right shoulders, so that will hopefully boost up the interest level a bit. Or boost up the frustration level considering how abominable my last attempt at freehanding (the banner on the Sternguard conversion) turned out.

The pic to the right presents the 3 remaining Terminators I have left to paint - 2 standard shooty Termies with the Terminator Sergeant in the center. The Terminator Sergeant looks fun, if a bit intimidating. I think I'll either do him next (just to break up the monotony) or save him for last. I'm afraid that if I save him for last, I'll end up rushing to make the deadline, but the advantages of doing him last is that I'll be able to commit all of my painting mistakes on the standard Termies and thus apply the hard-earned wisdom on doing the best job on the Sergeant.

So, 6 days left to essentially paint 3 Terminators. No sweat!

Leia Mais…

Wednesday, August 5, 2009

47 - Blood Ravens 2,500 Points Army List


Still working on the Kroot Carnivore and the Skaven Plague Monk. I'm pretty much just highlighting them and putting the finishing touches here and there, then they'll be ready to be photographed. ETA a day or so.

Meanwhile...here's another army list! Again, I'm mostly doing this for housecleaning reasons - I tidied up the sidebar by removing the full army lists and instead replacing them with a linked Army Lists Archive. But the only way (as far as I know) to create a link is to actually publish a post on the blog. I realize I could've backdated the posts, but since my blog's been a little quiet while in the aftermath of the Sternguard tutorial, I figure might as well pick up the slack with some hobby related posts.

So, without further ado...

Blood Ravens Army List - 2500 points


Legend:
Completed
Work In Progress
Assembled
On Sprue
Not Owned

HQ - 445 pts.
Captain
- power sword, boltgun
- Razorback

Command Squad
- apothecary, company standard, champion, meltagun, plasma gun

Librarian (attached to Terminator Squad)
- terminator armor, stormbolter, Null Zone, the Avenger

Troops - 565 pts.
Tactical Squad (10)
- meltagun, multi-melta, sergeant w/ power fist
- Rhino

Tactical Squad (10)
- missile launcher, lascannon, sergeant w/ power weapon
- Rhino

Scout Squad (5)
- 4 sniper rifles, heavy bolter, camo cloaks

Elites - 595 pts.
Terminator Squad (5)
- assault cannon
- Drop Pod

Sternguard Veteran Squad (5)
- heavy bolter, plasma cannon, sergeant w/ power fist

Dreadnought
- heavy flamer, extra armor
- Drop Pod

Fast Attack - 450 pts.
Assault Squad (10)
- 2 flamers, sergeant w/ combat shield & lightning claw

Land Speeder Squadron (2)

Space Marine Bike Squad (3)
- sergeant w/ power weapon
- biker w/ meltagun
- biker w/ flamer

Heavy Support - 445 pts.
Land Raider
- multi-melta

Predator

Vindicator
- siege shield

To get to 2000 pts., minus:
- Predator
- Sternguard
- Drop Pods
- Land Speeders
- Scouts
- Flamer from Space Marine Bikers

Again, all comments, criticisms, advice, etc. are welcome.

Leia Mais…

Thursday, July 30, 2009

44 - Blood Ravens Sternguard Tutorial Part VI


Well, I'm going to make this the last post in my Blood Ravens Sternguard tutorial for a couple of reasons: 1) I'm personally getting bored with the model! 2) I intended to do a tutorial on free-handing the Blood Ravens insignia onto the banner, but realized that I really, really stink at free-handing! So I quickly wiped the offending blotch off the banner and decided to keep quietly working on my free-hand on unfortunate pieces of plasticard rather than ruin perfectly good models. 3) A 6 part tutorial on a single model seems like more than enough. Too much perhaps.

So, what I have here (pictured on the upper left) is my Blood Ravens Sternguard, 95% complete. After basecoating the fiddly bits with 3-4 thin layers, I applied controlled washes over the whole model - Devlan Mud was used on the Old Parchment (except for the shoulder pads - I wanted to keep them pristine) and Antique Gold parts; Badab Black on the Bridge Gray and White; and Baal Red was applied liberally over Opaque Red of the power armour and the banner. When I apply washes, I try to maintain as much control over the flow of the ink as much as possible. I'll load up the tip of a 0 or 00 brush with some of the wash, then carefully let it run along the recesses and cracks of the area I plan on shading. I just find a more controlled wash helps you cut some time off the next step when you bring the basecoat colors back up plus it also avoids the dreaded dried pooling effect that sloppy application of washes can sometimes produce. (I've read that adding a small drop of dishwashing detergent to the wash can help avoid the pooling effect, but I've only tried it once or twice. I don't know - I'm sure it works, but the result was so marginal for me that I just stopped doing it, mostly out of forgetfulness. Usually, unless something is so amazingly effective and obvious, I won't try to integrate it into my everyday practice.)

Overall, I was happy with how the Citadel Washes worked, as I have been since buying them 4 months ago. Games Workshop may rightfully get slammed for a lot of things, but they done good with their Washes, in my opinion. The only thing I wasn't happy with regarding this model was the liberal Baal Red wash I applied on the power armour. The result was splotchy, darkened areas all over the armor as opposed to just in the recesses. My thought process was that since the basecoat was a bit flat and the coverage of the Opaque Red wasn't 100% perfect, the Baal Red wash would fill in the coverage for the Opaque Red while at the same time adding some shine and depth to the armor. Well, it did add shine, but it didn't add uniform coverage, that's for sure. I had to go over the wash with more Opaque Red basecoat to minimize some of the splotchiness, but as you can see, I wasn't completely successful. I think I've learned a valuable lesson for any future Blood Ravens I'll be painting up: do not use a liberal application of the Baal Red wash on the power armor; instead, apply a controlled wash of Badab Black to the recessed, then use paint layering (from dark to light) to give the illusion of depth.

The base was basically decorative sand glued on with white glue, then painted over with a basecoat of Brown Velvet followed by a drybrush of Desert Sand and light wash of Devlan Mud. The thorny bush looking thing was decorative moss purchased at Michael's glued down with superglue, and the small brown rock bit was a piece of cork also held down with superglue.

Looking back, I'm not completely satisfied with either the model or the tutorial. I tried to make the tutorial as comprehensive as possible, and I think that was partially why it might not have been effective as it could be. It seemed too sprawling, included too much repetition and the laying out of too obvious steps. As I said in my last post, I think in the future, my tutorials will focus more on highlighting interesting things I might have picked up in regards to the various aspects of the hobby rather than on the more mundane things. Tutorials focused on clever conversions seem to be very popular with readers, so I might focus on that. As for the model itself - well, my interest in it waxed and waned as this process trudged along. This is the longest I've ever spent on a model. The first tutorial was posted on July 24, and it's taken 6 days to reach the end. I'm usually able to paint up a model in 2 or 3 days. By the Part VI, I did not want to even look at the miniature let alone paint it.

Okay, so as for what's up next on the blog? I have no idea! I have the Skaven Plague Monk and the Kroot Auxiliary still left over from the also-rans of the poll, but I also have an Imperial Guard Platoon Commander beckoning to me from my workshelf. We'll see...

Click here for more pics on the Sternguard WIP.

Leia Mais…

Wednesday, July 29, 2009

43 - Blood Ravens Sternguard Tutorial Part V


The picture on the left shows the Blood Ravens Sternguard with his right arm wielding his pimped out bolter and backpack attached, and primed with Black (brushed on). It's slowly coming together. I then proceeded to paint the backpack and arm Opaque Red, his shoulder pad Old Parchment, and his bolter Bridge Grey. I also finally decided to just paint over his knee pads Opaque Red because I desperately want to avoid making him overly colorful. He's a hardened space marine, for goodness sakes! I keep returning, for reference, to the image of GW's Sternguard as well as the two Tactical Blood Ravens I've already painted up in order to get an idea as to whether or not I'm on the right track. Primarily, I want this Sternguard to stand out from the Tacticals while simultaneously not going overboard with the bits and bobs. In other words, I want him to look like a well-decorated veteran of the Blood Ravens various campaigns against heretics and xenos scum but not so much so that he becomes a walking display board for The Bitz Barn.

3 thin basecoats later on the arm, bolter, and backpack, and we get the result show on the right. You'll notice that I've added a handful of embellishments (with 2 thin basecoats) to the model - a banner pole, a tabard over his right shoulder pad, a crux terminatus on his backpack, and a belt decoration from a Terminator sprue to his right shin guard (which was an attempt at copying the effect on the GW mail order only Space Marine Sergeant seen here - note the Imperial Aquila on his left shin guard). If I were more confident with my greenstuffing, I would have integrated the belt decoration more seamlessly into the leg of my Sternguard, but I'm not. Regardless, I'm pretty satisfied with the effect, and I can always come back at a later date and try the green stuff when I feel I'm ready for it. At this point, he's practically done. I'll very likely add 1 or 2 more layers of basecoats to the embellishments, then make an attempt at free-handing the Blood Ravens Chapter Marking on to the banner as well as some free-hand work on the shoulder pad tabard. After that, I'll move on to the wash stage, the bringing the basecoat back up and highlighting stage, and finally end with painting and sprucing up the base a bit.

By the way, check out Thomas Schadle's rendition of the Blood Ravens. His painting ability almost makes me want to throw my own Ravens into a tupperware container filled with Simple Green and start over. Ah, but then I notice he's done very well in the Golden Daemon competitions (even winning the L.A. Slayer Sword back in 2005 for his Blood Ravens Librarian) and realize how silly it is to compare myself to him. He's painting at a major league level, while I'm very obviously toiling away in Tee Ball at the moment. My wife remembers when I first started this hobby, I would constantly bemoan my lack of ability especially after browsing through the awesome paintjobs on CoolMiniorNot. Viewing the finished products of such accomplished painters almost made me want to quit until 2 things happened: 1) I noticed that so long as I kept practicing my painting, I actually got better (fancy that!); and 2) I finally came to the very sane understanding that a handful of months invested into anything is not enough time to become very, very good at it. (Unless we're talking about falling down. Maybe a couple of weeks would be enough to get very good at falling down, but you know, not even. Just ask circus clowns and stunt men/ women how hard it is to fall down convincingly without cracking your own head open. But I digress...)

My apologies for this tutorial going on so long. In the future, I'll cut out some of the more mundane aspects of putting these miniatures together and jump straight to the painting technique. I still need to refine my tutorial presentations to give you all a better look into how I paint, but I always knew that designing tutorials would be difficult. Hopefully, I've learned something from this first initial go of it.

For more pics of this work in progress, click here.

Leia Mais…

Monday, July 27, 2009

41 - Blood Ravens Sternguard Tutorial Part IV


After laying down the Opaque Red basecoat, I proceeded with painting in the details and fiddly bits. The picture on the left shows what the model looks like after one thin layer of Delta Ceramcoat Old Parchment on the helmet, the shoulder pad, and the purity seals; Americana Antique Gold on the chest design, the belt skull, and the purity seal medallions; Delta Ceramcoat Bridge Gray on the belt, the joint connection bits, and the pneumatic chords on the power fist; and Delta Ceramcoat's Christmas Green on the tiny electrical wires scattered throughout the power armor and eye lenses of the helmet. As usual, all of the paints were thinned with Flow Aid until the consistency of skim milk. This first layer of detail work took about 10 minutes, after which I placed the model aside for about 5-10 minutes in order for the paint to dry.

The detail work is actually my favorite part of painting models. Oftentimes, the basecoat is already prescribed for you - an Ultramarine will have a blue basecoat, a Blood Raven a red basecoat, a Cadian Guardsman a green and khaki basecoat, etc. It's the fiddly bits, however, where one's creativity is challenged. You get to decide, for instance, what color you want to make the wires or the purity seals or the lasgun casing or whatever. Now, you can't just willy-nilly apply a rainbow's worth of colors to the details because that'll just result in a cluttered, motley appearance to the model (which doesn't usually work unless you're painting up Eldar Harlequins, I guess). Rather, your color scheme has to not only reflect your own personal creativity, but also honor reality to a reasonable extent.

The picture on the right is of the model after 3 layers of thinned paint on the detail bits. Practically done - total painting time about 1 hour if you count the intervals waiting for the paint to dry. The basecoating of the detail bits usually takes less coats and time because of how little surface space is involved. You want to be sure, though, that your paint is thinned down even more when you basecoat because of how easy it is for the paint to creep into the really fine detailed and textured areas and clog up the works, leaving you with a shapeless mess.

As an aside - I use a Size 1 Round paint brush for both the basecoating of the large areas of the model and the detailed areas. The only times I switch to a larger or smaller brush are if I'm priming (whereby I will use a Size 4 Flat brush) or if I'm painting tiny, tiny areas like eyes and jewelry (whereby I'll use a Size 00 Round). I've yet to invest in a truly great brush (like a Kolinsky Sable) because a) I just don't think my skills are at that level yet (which is also why I'm still working with craft paints) and b) I'm terrible when it comes to keeping my brushes clean. I mean, I'll swirl my brush in the water glass after every 2 or 3 dips of the brush head into paint, but after I'm done for the night, I very rarely thoroughly clean my brushes. So until I become more conscientious about that, it's $4.99 cheap brushes for me.

At this point, the model is practically ready for shading via Citadel washes. I still have a couple of decisions to make though. For instance, what color do I want the knee pads to be? (I'm leaning towards just painting them Opaque Red, but a part of me wants to do them in Old Parchment like the helmet and shoulder pads.) Also, the Antique Gold studs on the Heresy-Era shoulder pad seem to blend too much into the Old Parchment - I think I'll actually paint the studs Black. Finally, what else do I want to add to this figure? I've got 2 tabard pieces ready to be primed and glued on, the right arm with the Sternguard bolter, the backpack, a banner possibly, and maybe the Dark Angels helmet wings. I'll leave those decisions for Part V.

Leia Mais…

Sunday, July 26, 2009

40 - Blood Ravens Sternguard Tutorial Part III


Rather than devote an entire post to basing (especially since at this point, all I've done is apply some watered down glue to the base and dip the model into decorative sand), I will move on to the actual painting of the model.

The photo on the left is of the model primed in Black. You'll notice that I've gone ahead and attached the power fist and the Heresy Era studded shoulder pad. I've left the left arm, the Sternguard bolter, and the backpack off (as well as any fiddly bits I might decide to add later) because I felt they'd get in the way of the painting. For this model, I brushed on the primer. My preference is always to brush on primer rather than use the spray can because I feel it gives me more control over where the primer goes. Now, if I have 4 or 5 or 6 or more assembled models that need to get primed, then I'll use the spray can on them, but mostly out of laziness. Overall, I'm just not a big fan of spray on primer or varnish. I've had too many bad experiences with them even in the short 7 months I've been at this hobby.

The Black primer I used was thinned down using one drop of Liquitex Matte Medium. The reason for using matte medium is twofold: 1) never apply acrylic paint directly onto your models because the paint will go on too thickly and blot out the subtle textures/ details; and 2) I've had no luck thinning paint down with water - the paint just loses its consistency and adhesion too much for my taste when I use water.

After priming the model and waiting for the paint to dry, I went to work on the basecoat. The paints I used, unfortunately, are craft paints of the Folk Art, Americana, Delta Ceramcoat variety, so I'm not going to be able to give you a "counts-as" comparison to any of the specialty model paints like GW, Reaper, or Vallejo. I'll use the exact names of the craft paints though just in case. Also, I afix the model's base to the top of a Delta Ceramcoat 2 ounce acrylic paint squeeze bottle with some Elmer's poster tack in order to avoid touching the freshly painted model with my fingers as I spin and rotate it whichever way during painting.

The first basecoat I applied was Delta Ceramcoat's Opaque Red on the power armor portions of the model. I thinned the acrylic paint down with one drop of Liquitex Flow Aid, so that the consistency of the paint (and I'm sure you've all heard this before) was like skim milk. Again, I prefer Flow Aid over water because of two reasons: 1) it reduces the surface tension of the paint and thus gives me more control over where it goes (watered down paint has a tendency of running itself all over the model); and 2) it reduces, to an extraordinary degree, brush marks on the model. The image on the right shows what the model looked like after 1 coat of thinned down Opaque Red.

One of the most important virtues I've learned since picking up this hobby 7 months ago is patience. In the beginning, I'd try to get the basecoat on as quickly as possible. As a result, I'd do myself more harm by not only painting wet paint on top of wet paint (which is akin to trying to dig a hole in soft sand), but I'd also glop on too much paint because I was so eager to get opacity on the basecoat. These days, I take my time. This first basecoat was done in 15 minutes, but I don't apply another coat until the first one is fully dried. Usually, it just takes a 5-10 minute wait for the paint to dry, so in the meantime, I'll work on anther model or read or watch TV or surf the net or something.

The picture on the left shows the model after 2 more layers of Opaque Red (for a total of 3 layers). Not quite done yet, but almost there. Red is a notoriously difficult color to achieve opacity, so it doesn't come as surprise to me that it might take 4 or 5 thin layers to get the proper coverage for the basecoat. With another color - say Blue (if I were doing an Ultramarine) - I'm pretty certain I'd be done with the basecoating at this point. But since I chose the Blood Ravens...

You'll notice that I've kept the non-basecoated parts of the model fairly neat and clean. What I'll do after, say, basecoating the legs is immediately go back over the knee pads or the belt or the purity seals with a damp brush and take off the inadvertent paint smudges. I find that this serves two purposes for me: 1) it trains my brush strokes to be as neat as possible; and 2) it introduces me to the very helpful skill of "erasing" paint with a damp brush. This second reason has really served me well as I've progressed in this hobby. Before, when I tried to get rid of stray paint, I'd end up destroying whole swathes of nicely painted surfaces. Now, I'm much more surgical with this ability.

The picture on the right shows the model after 4 1/2 layers of basecoated Opaque Red. The power armor's pretty much done at this point. Overall time: about 1 1/2 hours (15 minutes per layer plus roughly 5-10 minutes wait in between layers for the paint to dry). I'll start the detail bits next, which I'll save for Part IV.

Click here for more pics of the model in progress.

Leia Mais…

Saturday, July 25, 2009

39 - Blood Ravens Sternguard Tutorial Part II


I am now going to turn to the conversion of the standard Tactical Marine bolter into the Sternguard bolter. Let me first direct you, though, to WeeMen's post on converting the Sternguard bolter here, as it was a big reason why I even thought this particular conversion was possible.

The picture on the left shows, from left to right, a Rhino storm bolter, a scope from a Tactical Marines sprue, and a standard Marine bolter. The plan is to remove the box magazine from the storm bolter and graft it onto the standard Marine bolter in such a way as to mimic the appearance of the bolters on GW's Sternguard metal models. Now, this should be a very simple conversion - 2 small bits removed, one bit tossed away, and the second bit glued onto the Tactical bolter. The only tricky part is how small these bits are. One bad, hasty cut with the hobby knife, and some piece of important gray plastic is going to get ruined.

So, first, I go to work on the storm bolter. I suggest you place the storm bolter flat on a cutting surface and cut down with your hobby knife initially where the box magazine meets the barrel. Cut all the way through with slow, steady cuts. Very likely, all you will need are 2 or 3 of these cuts with pressure downward being applied with each cut. Then work on the side of the box magazine touching the rear of the storm bolter. When both side cuts are all the way through to the other side, you can then cut horizontally, along the top of the box magazine. This cut should also be done slow and steady and is, in fact, the most difficult one to execute because of the awkward angle. However, this cut doesn't need to be done all the way through because a half-way cut on both sides of the storm bolter (i.e., as if you were scoring foamboard) should be deep enough where you can then pry the box magazine loose with a plier or just with some elbow grease. The finished result should look like the image to the right.

Now, before doing any clean-up on the detached box magazine, you should proceed to converting the Tactical bolter. This is because you don't want to file down the box magazine too much until you can gauge what sort of fit is going to be required when you graft it onto the Tactical bolter.

For the Tactical bolter, you're basically going to do the same thing - i.e., remove the magazine so that all that is left is the bolter. You can also remove the pistol grip because when you glue the converted bolter onto the Space Marine right arm, you're going to have to remove the grip anyway. The cutting you will do on the Tactical bolter is going to have to be even more careful and measured than the storm bolter operation. This is because we didn't really care how badly we damaged the storm bolter while we do care if the Tactical bolter gets marked up, for obvious reasons. After cutting the magazine from the Tactical bolter, you can now go ahead and file down the gap in the bolter so that it creates a smooth, even space for the box magazine to slide into. See the picture on the left. (Note: even though the pistol grip is present in the picture, I removed it shortly after taking the picture because it was already hanging on by a, er, thread of soft, gray plastic, or something.)

Okay, and now for the final step (a two-parter) - we must glue the box magazine removed from the storm bolter onto the space left on the Tactical bolter from its removed magazine. First, dry fit the box magazine to see how much you need to file on both the box magazine and the Tactical bolter in order to get a even, flush fit. You want to line up the box magazine so that it sticks out the right side of the bolter. So, in other words, line up the bolter along the left hand side of the box magazine. Once you've smoothed out any rough, uneven edges, apply a little bit of glue on the Tactical bolter and then press the box magazine down into the gap. Hold the box magazine in place while slowly, carefully sliding it into place so that it is straight and not on a tilt. When you are satisfied with the placement of the box magazine, hold it the glue sets a bit, then lay it aside to dry. After the glue has dried, you'll want to finally attach the scope to the top of the bolter. If you look closely at the bolter, you'll notice an upraised piece near the rear. This is where you want to glue the scope. Now, make sure you file the scope down so that it fits smoothly along this small, upraised piece, then glue down and hold. After a minute or so, you should have the finished product pictured on the right.

Part III of the tutorial will be a short one involving basing and priming the model. And then with Part IV, we'll jump right into the painting!

Leia Mais…

Friday, July 24, 2009

38 - Blood Ravens Sternguard Tutorial Part I


Welcome to the first of hopefully many tutorials on my blog! By popular vote (big thanks to everyone who voted!), the first set of tutorials will detail how I approach - from conception to assembly to painting to basing - a Blood Ravens Sternguard Veteran. Now, seeing as this is my first attempt at putting together a tutorial, please feel free to include suggestions in the comments. My goal in doing tutorials is to help people in some aspect of the hobby in the same way I was helped by tutorials when I first started out. So, if my tutorials are hard to understand, lacking in detail, just plain unhelpful, tell me so and, with your suggestions, I'll try to make them better in the future.

Quick note: because I won't be using green stuff (I think) in this Blood Ravens Sternguard conversion, I'm left with merely trying to piece together a model from the existing bits I own. I hope the conversion will still turn out fairly characterful and different from the standard Marine. Maybe in the future, when I'm more confident with my greenstuffing abilities, I'll attempt a more radical conversion of a model using green stuff.

Research

Before I ever put paint brush to miniature, I always invest a little bit of time into researching the look, feel, and fluff behind the model. The time spent researching obviously varies depending on whether or not I've painted a particular type of mini before, whether the mini is of an elite/ special type as compared to a rank and file type, and whether I plan on converting the figure very much beyond its original form.

The image on the upper left - courtesy of Games Workshop - is of their Sternguard Veteran Squad set. Pretty cool looking bunch, and I'll be using them extensively as source material for this tutorial on how to conceive, assemble, paint, and base a converted Blood Ravens Sternguard Veteran. I've also found a few other images of converted Sternguard scattered around the web which I've found pretty inspiring (here, here, and here). The first link to Weemen has been particularly helpful, especially his tutorial on how to convert standard pattern Space Marine bolters into specialized Sternguard bolters. The Sternguard conversions for the second link begin after the Honour Guard conversions, and I must admit, those Sternguard WIPs are absolutely stunning and pretty much blow anything I will show in this tutorial out of the water. Check them out; they're awesome.

Gathering the Bits Together

After doing the research, I began sorting through my bits boxes and relevant kits to find the parts to make the Blood Ravens Sternguard. Based off of the images I linked to above, I knew that my two biggest challenges in regards to this conversion would be: a) making the miniature grand and eminent enough compared to the standard Tactical Space Marine without making it look like an overburdened Christmas Tree, and b) converting its Sternguard bolter.

With those two thoughts in the back of my head, this is what I ended up with, parts-wise (see image on the right). The torso, leg, and shoulder pads bits come from the Command Squad sprue; the backpack, bolter, scope, and right arm come from a standard Tactical Squad sprue; the power fist and tabards come from a Sergeant upgrade sprue; the helmet wings and Mk. 6 beakie helmet from a Dark Angels sprue (I will file off the dagger design on the beakie helmet as best I can in order to better fit this model into the Blood Ravens image, but I'll keep the wings which radiate out from the dagger and along the sides of the helmet because the Blood Ravens do incorporate wing icons/ symbols into their chapter design); the small shield on the bottom right comes from a Terminator sprue; and the storm bolter comes from a Rhino kit.

My plan is to convert the standard pattern bolter into a Sternguard bolter by combining it with the storm bolter from the Rhino and the scope from the Tactical Squad sprue. I'm still undecided whether or not to use the helmet wings - seeing as he's a Blood Ravens Veteran, I think the wings will fit, fluff-wise. We'll see.

You'll also notice that the gathered pieces still need a lot of cleaning up of the mold lines and excessive flash. I won't bore you with the details of that step of the tutorial - suffice it to say, it's my least favorite part of this whole endeavor, as I've probably written about already. I do have one small bit of insight regarding the use of the file in cleaning up models: I've noticed on many YouTube tutorial videos that people tend to scrape their file across the mold lines in a saw-like, back and forth motion. In my experience, moving the file in one consistent direction (say forwards only) tends to result in more consistent and cleaner mold removal. I think this is because files are designed with the rough edges only going in one direction, but I could be wrong. I personally think the longer one is involved in this hobby, the more quirky beliefs one develops - even if those quirky beliefs have no basis in fact. Which is perfectly fine, of course. I'm firmly in the camp that believes this hobby of ours is a legitimate artform, and as in every artform, eccentric and personalized methods oftentimes work just as well as the "standard" methods, if only because they allow the creator to work within a comfort zone.

Assembling the Model

After cleaning as much of the mold lines and flash as I could possibly bear, I began assembling the model. I always assemble my models in the same order - 1) put the torso bits together, 2) glue torso to legs, 3) glue head to torso, 4) glue model to base. I put off gluing the arms (for the most part) and backpack to the model because I don't want them getting in the way when I'm painting the chestplate or the back of the model. In order to figure out for sure whether a particular piece of the model will obstruct painting, I'll use putty to dry-fit the extremities of the model together (see left). Well, looks like the bolter arm will for sure get in the way, so I'll leave it off until after I've painted most of the model. I might glue the power fist on because it looks like it's in the clear though. Also, eeew, looks like I missed cleaning up some of the mold lines on the arms and the helmet. Argh, back to the salt mines then with my tools of ignorance - the ever reliable hobby knife and file.

As this post is already getting a bit long, I will save the conversion of the humble Tactical bolter into a Sternguard bolter for part II.

Leia Mais…

Wednesday, June 10, 2009

22 - Blood Ravens Scout


This Blood Ravens Space Marine Scout was pieced together from bits I purchased off of eBay. I had originally thought that by buying parts separately, it would be cheaper than buying the full sets (even at discounted prices), so long as I promised myself that I'd only buy the bits if the price was right ($.99 to $1.04). Well, it turns out my theory was right and wrong. It certainly is cheaper (if you have the patience, of course) to scrounge sets together via buying the bits individually. For example, under the most ideal of circumstances (which almost never exists because bits like legs and the heavy bolter usually sell for far more than the $.99 to $1.04 price range I set for myself), I could've pieced together 5 Space Marine Scouts (with accessories and all of the alternate weapons arms) for around $10. The MSRP for a Space Marine Scout kit is $20 while discount on-line stores like Chaos Orc's Superstore sell it at a 25% discount for $15. Not much of a difference, plus a whole lot of headaches to go along with it.

I guess the lesson I learned from this is that bits purchasing should be reserved primarily for conversions. This might seem like an obvious conclusion for the more seasoned hobbyists out there, but for a beginning collector who felt queasy at some of the high prices being charged for these plastic miniatures (coupled with just how addicting collecting these little buggers can be), I was seduced by how cheaply some bits sellers were auctioning their stuff for on-line.

Okay, enough rambling about the high cost of living. Painting-wise, I was fairly pleased with how it turned out on the Scout. My lines are becoming very clean and neat, the surfaces are smooth and the coverage is acceptable, for the most part. Red, as usual, is still difficult to get full coverage with. I tried Delta Ceramcoat's Opaque Red this time, thinking that the "opaque" in its name actually meant something. And it does, to a certain extent. It certainly covers better than the other craft paint reds I've tried, but it still takes many multiple thin layers to achieve proper opacity, especially over a black undercoat. I'm thinking for my future Blood Ravens, I'm going to try the 2 undercoat technique - i.e., prime the parts of the model that won't be painted red in black, and prime the parts that will be painted red in white. It sounds like a mind-numbingly slow process, but I guess I can try it with 1 or 2 of them and see how it goes.

Highlighting-wise, I used Bridge Grey to highlight the wrinkles in the Scout's legs and arms. I was also far more careful with highlighting his face. Overall, I'm pretty satisfied with the parts I highlighted, but, of course, large swathes of the model remain un-highlighted. One day, I will try the layering technique that Simon mentioned in his comment to my Veterans Squad post on my Space Marines' armor.

As for the color scheme for this Blood Raven Scout, I couldn't find any visual references anywhere on the net except for this figure on Cool Mini or Not. It's a really awesome paintjob, in my opinion, so clean and smooth, but the color scheme didn't fit my image of what a Scout from the Blood Ravens Chapter would look like. So, instead I merely shifted the Blood Ravens Space Marine colors around for my Scout - the black trim from the Space Marine shoulder pads became the black of the Scout's pants and sleeves; the off-white of the shoulder pads themselves became the off-white of the wristguards; and, obviously, the red.

Okay, well, this is getting a little long-winded, so click here for more pics.

Leia Mais…
Blog Widget by LinkWithin