Here we have the ten marines who make up my first tactical squad, "Contemptus." The Sergeant is armed with a Power Fist and the two specialists are equipped with a multi-melter and a flamer. The squad will also be mounted in a Rhino (which I have yet to paint). I have a 2nd tactical squad which I've also painted up (to be named "Fortis"). I'll put up a post with them next.
Squad Contemptus is a mixture of Black Reach and Tactical Squad kits. The Black Reach marines are easily distinguished by the molded Tactical Squad arrow on their shoulder pads. I've yet to apply water-slide transfers on my Blood Ravens, mostly out of sheer laziness. Usually, after I finish off a miniature, I just want to move on to the next one and so I neglect things like transfers, final highlights and even decorative bases at times.At some point, I'm going to dive into painting a vehicle. I have all of the tools ready and at my disposal. I picked up a cheap airbrush from Michaels which I want to try on one of the vehicles. I'll probably also try using a standard spray can as well as manually brushing on the basecoat just to see which technique suits me best.
Wednesday, January 26, 2011
97 - Blood Ravens Tactical Squad "Contemptus"
Saturday, January 22, 2011
96 - Blood Ravens Scout Snipers
I told you I had quite a backlog of painted miniatures. In this post, I give you 2 Scout Snipers. I had originally painted up a single standard Scout about a year ago, but after getting my hands on the Sniper Scout bits, I decided to go with a full 5 man Sniper Team for my Scouts. I debated whether to turn one of them into a Heavy Bolter support guy, but I liked the look of the Sniper Scouts so much I decided to go 100% sniper rifles.
The Scout depicted to the left has some minor conversion. His legs are from one of the Scouts mounted on the Land Speeder Storm kit. I added a bit of cork under his right leg to give the impression he's just emerged from a sniper's nest hidden amongst rocky ground. His cloak is also from another kit - some Warhammer Fantasy Battle kit that I can't quite remember right now. It's hard to see with the angle of the photograph but the fact that it doesn't cover his shoulder pads should tell you it's not from the original Scout Sniper kit.
The Scout to the right is pretty much standard Sniper Scout parts.
Alright, up next should be the remainder of the Blood Ravens miniatures I painted up during my hiatus - mostly Tactical Squad Marines. I managed to complete both of my 10 man Tactical Squads during the hiatus.
Thursday, January 20, 2011
95 - Blood Ravens Sternguard
Here are 2 more members of my planned 5 man Sternguard Veterans Squad. The veteran to the left is armed with the special bolter which fires 4 different types of ammunition that the unit gets as their default weapon. He's had some very minor conversions done to him; for instance, his right shoulder pad is from the Command Squad kit and his bolter is from the Black Templars kit with a standard storm bolter box magazine glued to its bottom. Again, paint-wise, he's fairly standard for me. I like how he looks suitably decorated - it definitely gives him a veteran feel without going overboard with the embellishments.
The veteran to the right wields the Heavy Bolter. I actually think he turned out really well. I love his pose (which was achieved by using a pair of legs from the new Blood Angels Death Company kit). He certainly has a sense of purposeful motion about him. His helmet is also from the Death Company kit. While not everything Blood Angels would fit well as Blood Ravens conversions, with some strategic scraping off of mismatched iconograpy and choosing of parts, there are enough in the new Blood Angels plastic kits to really allow a modestly-skilled modeler like me the ability to customize a standard Codex Astartes chapter like the Ravens.
Wednesday, January 19, 2011
94 - Blood Ravens Company Command Squad
As promised, here are 2 members of my Company Command Squad - the Champion and the Meltagunner. I'm pretty proud with the way they turned out. The whites are much cleaner and opaque than I'd been able to achieve in the past and the overall models are just neater despite all the little embellishments they have. I especially like the Meltagunner. His pose is a bit too static in hindsight, but I'm pleased with how the paintjob turned out. Both miniatures are mounted on torn cork to simulate rocky outcrops. Gameplay-wise, I'm not sure how their elevated stature would impact them (negatively or positively - probably both in equal measure), but I felt for models that were meant to represent my HQ choice, they should stand out from the rank-and-file troops. Not much was added to the miniatures in terms of simple conversions, although I did give the Champion the Power Mace from the Black Templars upgrade kit to replace the Power Sword that came with the Company Command Squad kit.
Oddly enough, I've yet to tackle the Captain for the squad despite the fact that he's probably one of the first miniatures I ever bought (he comes from the Assault on Black Reach starter set). I think I'm still a bit intimidated by the amount of fine detail in his design; couple that with the fact that he's supposed to be the centerpiece to my Blood Ravens army and I suspect it'll probably be a while longer before I build up the courage to actually give him a whirl.
Alright, my next post will highlight 2 Sternguard Veterans that I painted in the past year. Stay tuned and thanks!
P.S. Quick shout-out to Bell of Lost Souls for kindly re-adding me to their blog alliance after my year long hiatus. You guys rock!
Tuesday, January 18, 2011
93 - Blood Ravens Assault Squad
Next up - 4 members of my planned 10 man Assault Squad. Standard paint scheme for my Blood Ravens. At first, I wanted to pin them to their bases with transparent flight stands, but after assembling about 5 of them, I realized I had completely forgotten to do that. Such is life. Instead, you'll have to imagine that these Assault Marines had just touched down at their destination and are about to wade into close-combat with the enemy.
The Sergeant is armed with a Lightning Claw and Combat Shield primarily because I wanted to paint a Lightning Claw (none of my other Blood Ravens are kitted out with Lightning Claws). A Power Fist might've been a more effective kit, but what the heck.
Up next for tomorrow - the first 2 members of my Company Command Squad!
Monday, January 17, 2011
92 - Don't Call It A Comeback!
Or do, if you'd like. Well, that was quite a long pause in-between posts. Let me re-introduce myself:
At one time, I maintained this blog 0n the hobby of miniature wargaming figures on a fairly consistent basis. That was about a year ago. Then I stopped because I thought applying to PhD programs in English Literature would be a good idea. I was wrong (and not because I didn't get into any - well, at least not entirely). Turns out, when your heart isn't into something which takes as much effort and dedication to get right, you usually end up wasting about a year of your life chasing shadows. So, instead, I've decided to follow where my heart was trying to tell me all these years and commit to becoming a high school English teacher. Teaching, really, is what I want to do. Researching and writing journal articles about obscure poets and poems was really the last thing I wanted to do. Thus, here I am, with my own life back and with the time to enjoy life in all its facets.
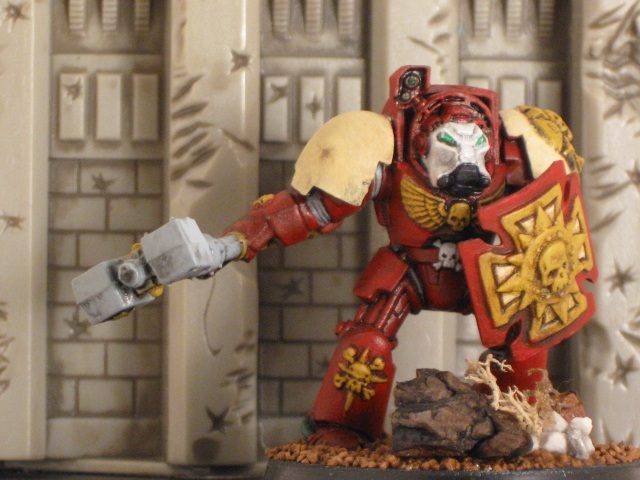
So, let's get right to it, shall we? Remember that project I was undertaking before this hiatus? The one about painting 365 miniatures in 365 days? Well, I obviously fell on my face with that one, but I wasn't completely dormant over this last year. I actually did get quite a bit painted up and my postings for the foreseeable future will be an attempt at catching you up on that. First up - two Blood Ravens Assault Terminators armed with Thunder Hammers and Storm Shields. Nothing fancy, but I definitely do think they are a step above what I had previously been doing. The past year has actually seen my abilities refined - not necessarily advanced, but most certainly perfected at my level of competency. There's really not much to say about these two aside from the interesting fact that the ink I used to shade them with was NOT GW's Citadel Washes (although I do love them). Instead, I used Liquitex inks (Carbon Black, Transparent Raw Sienna, and Transparent Burnt Umber) which I diluted with Flow Aid in order to achieve a consistency similar to GW's line of washes. The reason behind this was purely economical - the Liquitex inks come in almost triple the quantity for about a dollar more (if you don't count the judicious use of Michael's coupons) and all that's needed to wash an entire a figure are a drop or two of the inks to five or ten parts Flow Ai
d.
Oh, and the war-torn wall behind these fellows comes from a set of Heroscape scenery I purchased cheaply from eBay.
Well, hopefully this blog is up and running again. Stay tuned for more of my triumphant return!
Wednesday, March 10, 2010
90 - Hive Fleet Leviathan Genestealer
Here's my first attempt at a Genestealer. Overall, I think he turned out okay. He was, as expected, pretty easy to paint. I gave him a Black Gesso undercoat then basecoated him in White. After that, I liberally applied a Leviathan Purple ink wash mixed with Pink acrylic paint and watered down with Flow Improver to get that more pinkish (or as GW calls it Warlock Purple) coloring. When the wash dried, I went over the miniature with White again to bring the basecoat back up then picked out details here and there - the claws with Black and a feathering of Opaque Red; the back spine and forehead plate thingie with Rhinestone Purple; and the gaps in the carapace with Opaque Red and a Baal Red wash.
You'll notice the base is incomplete. I still need to paint it with Dolphin Gray in order to make it match the Termagant base (and to adhere to the rules I set up for myself regarding this project). But, alas, this is a case of expediency trumping principles. I just couldn't wait for the PVA glue to dry before painting the base so I just went ahead and took the photos. As Sophocles wrote in his play "Electra": "The end excuses any evil." Shameful, just shameful. (Apparently, this project is not only making me paint the backlog of miniatures I have sitting on my shelves, but it's also breaking my will down bit by bit. And it's only week 3!)
Okay, up next? Maybe that Tomb Kings Skeleton Archer, but maybe not. I have a day off tomorrow, so I just might paint up something more substantial. Possibly my Guardsman Marbo conversion? Or my Ork Kommando conversion? Or finally that Blood Ravens Multi-Melta Operator who's been sitting at my painting station all primed and ready to go? Who knows?
89 - Necron Warrior...Again
Heavens to Murgatroyd! Desperation has set in. I missed another day and am now 3 miniatures behind my pace. Thus, you all get another Necron Warrior. It's amazing how hard it is to find the energy, time, and motivation to paint these wee miniatures after a hard day's work (well, for me at least). Plus, the wife insists on quality time together in the evenings. Do her oppressive demands know no bounds?!? Just kidding.
So, Necron Warrior number 2. He was painted in pretty much the same way as my first Warrior - Black Gesso primer, a basecoat of Dolphin Gray, an extremely diluted Liquitex Carbon Black ink wash, then a highlight of more Dolphin Gray to bring the basecoat back up. The green bits were painted with Christmas Green and the eyes with Opaque Red. I then gave him a down and dirty and very quick drybrush with some White for more highlighting.
His base was put together with white talus and a strategically placed clump of dried moss all afixed to the base with brushed on superglue. Normally, I use watered down PVA glue for the basing materials, but I was worried the talus would be too heavy and irregularly shaped to properly bond with PVA glue, so I used superglue instead.
It seems to me that the two easiest armies to paint up in the Warhammer 40k and Fantasy Battle games would be Necrons and Tomb Kings respectively. Taking finances into consideration, I'm sure a person could completely paint a, say, 2000 point army of either of those two factions in a week or so. Especially the Necrons. Looking through their codex, I can't really imagine any models except for maybe the Flayers and the C'Tans who would require more than 1 primary color to basecoat. At least for the Tomb Kings, one has to worry about picking out details such as jewels, armor bits, and decorative stuff on many of their non-core choices. I don't really have a point here, and I'm certainly not bashing the painting abilities of Necron players because I'm sure it would take a long time to paint those models at a higher than table-top quality. I'm just saying.
Okay, another post will probably be coming fast and furious on the heels of this one. I've got a Hive Fleet Leviathan Genestealer completely finished at my painting station who is awaiting a decorative base and then some photographs. After that, I've got a Tomb Kings Skeletal Archer lined up, but I'm almost too guilty and embarrassed to paint him up for this project. But what can I do? The last thing I want is to fall so far behind that this project completely implodes. But I'd also like to spare you all the absolute boredom of 20 consecutive posts filled with Necrons Warriors, Genestealers, Cadian Shock Troopers, and Skeletons.
Monday, March 8, 2010
88 - Converted Gunnery Sergeant Harker
Well, I had a lot of fun with this guy! Here's my converted Gunnery Sergeant Harker who will replace my current Veteran Sergeant in the "50/50s." I love converting models, so whenever I have the opportunity to mess around with miniatures, I'll do it. Since I've never been very happy with my Veteran Sergeant (in terms of load-out, modeling, and paint job), replacing him with another sergeant has always been on my mind. After re-reading the Veterans Squad section of the Imperial Guard Codex, I realized that not only would replacing my Veteran Sergeant with Gunnery Sergeant Harker improve the offensive capabilities of the "50/50s," but it would also be an incredibly enjoyable conversion job.
My Harker conversion consists of parts from a few differen kits. His head, torso, left and right arms are from the Catachan kit. The heavy bolter and his right hand are from a Space Marine Devastator kit while his legs are from the Space Marine Scout kit. Overall, he was fairly easy to piece together. I was surprised at how well in terms of proportions the Catachan torso fit with the Scout legs considering how much taller the Scouts seem when compared to a standard Catachan trooper. I guess it helps that the Catachan models are so top-heavy and muscular.
When compared to the actual GW Harker miniature, my Harker obviously doesn't quite resemble him. For one, their Harker is much more statuesque and lean; I wouldn't be surprised if placed side by side that the GW Harker would be a bit taller than my conversion. Also, I couldn't quite get the string of bullets effect of the GW Harker. I tried by attempting all sorts of contortions with the Space Marine Devastator bolt feeder, but I couldn't get it to fit well enough. That's probably my biggest regret when it comes to this conversion.
Again, I forgot to do one tiny thing with a model. For this conversion, I kept telling myself I'd free-hand the name ("Payback") of Harker's heavy bolter onto the casing of the weapon after I had highlighted everything, but then...I forgot. I'll have to take care of that later.
Alright, so boy am I glad I didn't resort to painting up a Shock Trooper, Skeleton or Necron Warrior in order to somewhat keep pace with this project of mine. I have my day-off coming on Thursday, so tomorrow I might try another non-rank and file model. I've got a converted Guardsman Marbo waiting in the wings as well.
Sunday, March 7, 2010
87 - Necron Warrior
Well, apparently Necron Warriors are just as easy to paint as Fantasy Skeletons and Cadian Guardsmen. A Gesso Black primer, a Dolphin Gray basecoat, a Black ink wash and then some light drybrushing with Dolphin Gray to bring the basecoat back up. Finally, a bit of highlighting with White along the edges.
I guess I could have painted the Warrior up in a different, more complex color scheme, but I'm the type of person who likes recreating the actual look and feel of the fictional universe I'm exploring. For instance, I originally wanted to create a DIY Space Marine Chapter when I first got into this hobby. And I actually did write up some background fluff for them and even designed multiple color schemes for them using the Bolter and Chainsword Space Marine Painter. (Very cool tool for those of you who aren't aware of it.) But I just couldn't settle on a color scheme to my liking because it seemed like all of the cool schemes had already been taken! So I picked the Blood Ravens and the rest is history.
A good side effect of painting up this Warrior is that I can now add another go-to miniature to my list of "Quick to Paint" models. Of course, this means I'll have to kind of, sort of commit at least partially to building a Necron army - a codex of which I have no knowledge of. Well, the Necron Warrior box comes with 12 of these guys so at the very least they'll give me 11 more easy days (although at some point I might feel guilty over how simple they are to paint I just might consider counting multiples of them as 1 painted miniature).
Alright, still 2 behind. I primed my converted Gunnery Sergeant Harker and my Blood Ravens Tactical Squad Fortis Multi-Melta Operator today so they're technically next in line. But both seem like they would take too much time and effort at the moment, so I just might fall back to painting another Cadian Shock Trooper or a Necron Warrior. (I can't waste these guys though. I have to think strategically to a certain extent and save a handful of these easy miniatures for when I really need them.)
Saturday, March 6, 2010
86 - Shock Trooper for Third Squad/ 1st Platoon of the Cadian 265th Regiment
Cadian Shock Troopers are almost as easy and quick to paint as skeletons! Whoohoo! Now I have 2 fall-back miniature types I can use when I find myself pressed for time.
Again, in my haste, I realized only after the fact that I forgot to paint in his eyes. A few of these miniatures I've painted up in the past 2 weeks have been missing painted bits here and there. I'm really going to have to establish a pace whereby I don't feel too under the clock where my miniatures end up looking like half-painted blobs of paint but also where I don't torture myself over minute details to the point where I refuse to put a miniature down and say it's done.
So, this Cadian Shock Trooper begins my 3rd Squad (the 1st Squad being my Veterans - "The 50/50s" - and the 2nd Squad being a standard rank and file squad with an attached mortar team) for my planned Imperial Guard platoon. He was pre-primed months ago so all I had to do was slap the Cadian color scheme on him and then give him a liberal ink wash with Badab Black, Devlan Mud and Ogryn Flesh followed by highlights of Hunter Green, Fawn, and Dolphin Gray. Well, actually, I replaced the Badab Black ink wash with a Liquitex Carbon Black ink because I was almost out of the GW wash. The Liquitex Carbon Black actually worked quite well...after I mixed it with about 10-15 drops of Liquitex Flow Aid. Without the Flow Aid, the Liquitex ink was not watery enough to slip into the cracks and crevices of the miniature. Instead, it kind of just acted like watered down acrylic paint and clung to the surface. After massively diluting it with Flow Aid, it then began to perform almost as well as GW's Badab Black. It seems like the key to GW's inks, then, is how ultra-watered down they are. I've also picked up 2 or 3 other bottles of Liquitex's inks as supplements to my GW inks mostly because they're much cheaper. I'll still primarily use GW's inks though because, honestly, they're awesome.
Okay, I'm still 2 miniatures behind. I probably won't have time to do another model tonight (the wife and I have to attend a friend's birthday soiree), but I'll try my darndest to get 2 done tomorrow. On the docket: a Necron Warrior (easy-peasy, I'm expecting) and maybe my Gunnery Sergeant Harker conversion if I'm feeling particularly ambitious. If not, then another Cadian Shock Trooper or possibly a Blood Ravens Multi-Melta Operator for Tactical Squad Fortis.
Friday, March 5, 2010
85 - Blood Ravens Tactical Squad Fortis Meltagunner
Day 13, miniature 11; still 2 miniatures behind. Hmm, I sense more skeletons in the very near future. No, just kidding.
Say hello to the meltagunner of Tactical Squad Fortis of the Blood Ravens...er...huh, apparently, I haven't considered which company my Blood Ravens are a part of. I'll have to do some research into this. I know they can't be the 1st Company as that's usually the all Terminator veteran company in a standard Astartes force organization chart. They can't be the 2nd Company because they already have a published history (Dawn of War 2). They can't be the 5th Company because according to Blood Ravens fluff, that's the "Fated Fifth," a company that returned from the warp somehow...tainted. They can't be the 10th Company because that's the all Scout company. So that leaves 3rd, 4th, and Sixth to Ninth Companies. Anyone know if according to the Codex Astartes, those remaining companies have any prescribed specialities? In other words, are any of them primarily mechanized companies or jump assault companies or drop pod companies, etc.?
Well, there's really nothing all that special with this particular model. He's the 14th Blood Raven I've painted up, so it's getting rather mechanical painting these guys. At some point I'm going to either buy some blank water transfer paper or learn how to free-hand the Blood Ravens chapter logo onto their shoulder pads though.
Okay, so what's next? I've got a converted Gunnery Sergeant Harker I'd really like to paint but considering that I'm already 2 miniatures behind, I'm probably better off focusing on painting up more rank and file troops. I've still got about 30 more Cadian Shock Troopers to do so I just might go that route and try to pull back to even in my miniature count. But I've also got some converted Ork Kommandos that have calling to me from their place on the shelf. Hmm, well, we'll see.
Thursday, March 4, 2010
83 - Converted Lord Commissar
Well, I'm slowly falling behind my goal of 7 miniatures per week. At the moment, I'm now off my pace by 3 models. Boy, this is going to be harder than I thought. As I wrote in the post which launched this project almost 2 weeks ago, I do almost all of my painting either late at night during a workday (after the wife has gone to bed) or on my two off-days. The last two days, though, work has totally sapped my energy, so I got very little painting done Tuesday and Wednesday. However, I did cobble enough time together to paint up this converted Lord Commissar.
The Lord Commissar is essentially a Cadian Command sprue torso affixed to Cadian Shock Trooper legs. His power fist is also from the Command sprue while his bolt pistol from a Space Marine Tactical sprue. He is sporting a Pig Iron head and the tattered cape fluttering from his shoulders is actually a loincloth from the Warhammer Fantasy Giant kit. Overall, I'm pretty satisfied with him. He's not as grandiose looking as Games Workshop's Lord Commissar, but that's easily explained away. I'm just going to say that he's been out in the field for months, furiously barking at his men to dig in and hold the line against the xenos scum so reinforcements can drop down from the sky and save their worthless hides. In other words, he's had to abandon most of the shining accoutrements of his office in order to better do his job.
Painting-wise, he's okay, if a bit rough in some areas (my highlights are still too harsh). Turns out this Lord Commissar was easier to paint up than I thought, seeing as how his uniform is black, thus allowing me to basically use the Black Gesso primer as the undercoat and basecoat. I'll probably need to clean up the highlighting around his peaked cap as well as the blotchy paint around and about his bolt pistol, but he's for all intents and purposes finished. I'd like to possibly add a few more fiddly bits to him at a later date - maybe a sword scabbard, free-hand designs on his shoulder pads, and a pistol holster for starters - but that can wait for now.
Well, today is my day off, so if I plan on sticking with this project, I better get cracking on the painting. I've got a Vampire Counts Ghast primed and ready to go at my painting station. I figure he's going to be quite easy. As far as I can tell, VC Ghouls are basically a single primary color (for the skin) plus some contrasting colors here and there for the detail bits. Hopefully, I can get him painted up quickly and possibly move on to another miniature before the day is done. Best case scenario: I'm back to where I started to begin the week - one miniature behind.
Monday, March 1, 2010
82 - Skaven Clanrat
Finally finished with the Skaven Clanrat. As I wrote in my previous post, the new plastic Clanrats are very nicely detailed, so much so that it took me completely by surprise at how much fine effort was required to properly paint it up. I've got a couple of the new Stormvermin plastic miniatures laying around as well, and they look incredibly complicated. Considering Stormvermin are also Core units, I salute the efforts of all of the Skaven players who have to paint up 20 or 40 of them for their armies.
Again, pretty pleased with how this little feller turned out, although looking at it now, I probably should've given him a Black nose to make it stand out better. I also completely forgot to ink wash his teeth! Isn't it strange that the miniature with the most prominent teeth is the one I forget to shade while Imperial Guardsmen who have barely visible teeth always get the ink wash treatment? All in all though, I'm seriously considering starting a Skaven army. Aside from 40k Orks, most of my miniatures are human in nature and it would be a nice change of pace to be able to paint up more monstrous creatures. Also, the Skaven fluff is just awesome. How can anyone resist an army of mutated, overgrown rats who's politics are dirtier than our own?
Okay, I'm still 1 model behind in my project. This Clanrat makes it 8 miniatures in 9 days. I probably won't be able to make a serious attempt at catching up until Thursday (my day off). Still, the last thing I want to do is fall behind even further, so I have a couple of options on my docket for tomorrow - a Blood Ravens meltagunner, a Vampire Counts Ghast, or a converted Imperial Guard Lord Commissar. If I find myself really pressed for time, then the Ghast will step up to the plate for obvious reasons. If I find myself for some odd reason with ample time and motivation, then I'll do either the meltagunner or the Lord Commissar.
Sunday, February 28, 2010
81 - Tomb Kings Skellies
Day 8, miniature 7. Two skeletal spearmen for a Tomb Kings army (who will count as 1 miniature for the project). You all better get used to seeing skeletons on this blog because whenever I find myself falling behind on this 365 miniatures in 365 days project, I will resort to painting up skeletons. Not only are they extremely easy to paint but also extremely easy to make look decent with some ink washes and minor highlights. I got bogged down with the Clanrat so I broke the emergency glass and quickly painted up these two skellies. I thought the Clanrat would be easy but it turns out the new plastic miniatures GW have been putting out as of late are pretty finely detailed, even on the rank and file models. This is both a good and bad thing. Good in the sense that finely detailed models are always preferable to shapeless blobs of plastic; but bad in the sense that the notion of having to paint up 100 Clanrats and Skavenslaves is enough to make one run for the hills.
Do not fear, however, faithful blog followers! The 365 miniatures in 365 days projects is still on track! The Clanrat is almost finished; I only have one or two more basecoats to go and then an ink wash, some highlighting, a decorative base, and he'll be ready to go. That'll give me 8 miniatures in 8 days - bang on target. At some point, I'd like to start painting up more special characters rather than continue focusing on Troop/ Core choices, but for the moment, my painting acuity is still not quite at that speed.
Oh, by the way, I'm going to have to add a 7th rule to this project - I won't require myself to completely paint a miniature in a 24 hour period in order for it to count. In other words, I'll allow myself to start miniatures and then put them down to be finished another day. That way, I may actually get some more elaborate models done after a year. Still, the prime directive stays the same - after 365 days, I must have 365 painted miniatures.
Saturday, February 27, 2010
80 - Termagant of Hive Fleet Leviathan
Day 7 and here's my 6th figure of the week - a Tyranid Termagant in the colors of Hive Fleet Leviathan. A fairly easy model to paint although the fiddly bits around and in his fleshborer were a little annoying to navigate around. I can definitely imagine speed painting through dozens of these at a time - 2 primary colors, a 3rd color for the weapon biomorph and then a targeted ink wash in the crevices and voila! A finished termagant! I actually should get used to painting these critters seeing as I have about 30 of them in my army list and a further 30 more hormagaunts.
The termagant was basically about 3 basecoats of White and Purple and Red (for the detail bits) followed by ink washes of Leviathan Purple along the carapace and Baal Red in the joints and exposed flesh parts. I also applied a Thrakka Green ink wash to the Red bits. A drybrush of White was used to bring the basecoat back up and a Purple/ White mix was used to highlight the edges of the carapace. The base needs a little bit more touching up however. I was in such a rush to get started on the Clanrat that I painted the sand on the base before the PVC glue could completely dry thus removing granules here and there. As a result, the base looks a bit splotchy with too much of the black plastic surface showing.
Well, day 7 of this little project and I'm still 1 model behind. I've already begun painting up a Skaven Clanrat and I'm determined to finish him up before bed. It's a good thing tomorrow is Sunday as I imagine I'll be burning the midnight oil tonight. So far, I haven't felt burned out yet by all of this painting. In fact, I feel rather productive. At some point I probably should concentrate on 1 or 2 armies (my Blood Ravens are practically complete - only missing a Razorback - in terms of collecting the miniatures) just so I can finish one off rather than dispersing my attention and energies willy-nilly. But I have a terrible time staying interested in one particular line of miniatures for any extended period. Thus all the jumping around from army to army.
Friday, February 26, 2010
79 - Ogre Kingdoms Leadbelcher
Technically, this Leadbelcher was supposed to be done yesterday, but I got bogged down trying to get his skin to match the Games Workshop's ogre skin tone. I had basecoated his skin Dolphin Gray then, following the advice from a White Dwarf article on how to paint monstrous creature skin, I added Baal Red and Leviathan Purple ink washes (to give the gray some life). The result was some weird pinkish hue that reminded me of a jellyfish. Well, a heavily muscled jellyfish carrying a big friggin' hand cannon. So, I drybrushed a very light skin tone onto the miniature then, still not being satisfied, I drybrushed the Dolphin Gray on top of that. The final result is pictured in this post. Again, I'm pretty satisfied. The paintjob was fairly clean and while the skin tone still doesn't match the standard Ogre skin tone, it's at least interesting looking. Maybe I can make up a background story wherein this Leadbelcher once accidentally set himself on fire or something.
I'm also starting to become bothered by the mold lines on my miniatures. I absolutely hate cleaning the models. The most I ever do is remove the most glaring and obvious of flashing, but I almost never trouble myself with the mold lines. Sometimes, the paint is enough to cover some of it up; sometimes the mold lines kind of blend into the armor and equipment of a model (like for Tau or Space Marine figures). But on more organic looking miniatures like this Leadbelcher, they stand out like Yao Ming at a little people convention. So I'm going to make the concerted effort to be a bit more fastidious when it comes to cleaning my models. It's a pain in the butt, but I guess it's part of the hobby.
Well, I'm still one miniature behind. Apparently, the weather gods are on my side because they gave New York a snow day thus providing me with a 2nd day off from work to catch up on my project. I have 2 miniatures lined up - a Hivefleet Leviathan Termagant and a Skaven Clanrat. I'm hoping both miniatures are as easy and quick to paint as they seem.
Thursday, February 25, 2010
78 - Tau Fire Warrior
Day 5, model 4. As you can tell, I'm one miniature behind, but since the rules I established for myself allow me to miss a day so long as I finish the week with 7 painted models, I'm still on-track, I think. I have a day off from work today and it's snowing/ sleeting like the dickens in New York, so I should have enough free time to get my fifth miniature painted up before I go to bed tonight.
So, what we have here is a Tau Fire Warrior painted up in the "dress colors" of the army. I chose the Fire Warrior as my next model because I thought the simple color scheme would make for a fast paint job; I was wrong. While it's true the miniature pretty much uses 2 basic colors (a dull orange and a dark brown), the fact that I had never painted a Tau Fire Warrior before conspired to slow my progress down. Unlike painting Cadians or Marines, my hand had to adapt to new brushstrokes as I worked my way around the model's armor plates, trying not to get too messy and painting over the brown fatigues underneath. I also had to find a color match for the Vomit Brown GW uses for their Fire Warriors. Since I use craft paints bought cheaply at Michael's and A.C. Moore, I couldn't quite find a single comparable color match, so I settled on a dark yellow/ orange called Marigold and then gave it a liberal Gryphonne Sepia wash after finishing up the basecoat. Overall, I was quite pleased with the color match.
Some of the highlights on the Fire Warrior are a bit harsh and messy. At some point, I'm going to really have to learn to either a) become much more steady-handed when applying stark highlights or b) become adept at blending. The former obviously is easier and will be the path I'll go down in the near future. Blending, I think, will come much, much later in my development as a figure painter.
No conversions at all with this model. I did realize, after painting up the model, that I forgot to attach the communications antenna to the side of his helmet. Bleh, I always seem to forgot some little thing. Oh well, I'll fix that after I finish my 2nd model for today which I've decided will be an Ogre Kingdoms Leadbelcher.
Tuesday, February 23, 2010
77 - Updated Sniper For My Cadian Veteran Squad
Day 3, miniature 3. Wow...362 days and miniatures to go. I'm doomed.
Well, this fella wasn't too hard to paint up. I purposefully chose him because of his cloak. I figured with most of his body covered up by that big surface, it would take less time to fully paint him, and I was right. Thank goodness for cloaks! I also chose him because he was a Cadian model, which I've become very good at painting fast and clean. Overall, I'm pretty pleased with him. He could use a few more highlights, but he's table top quality, which is really the only thing I'm going for with this project. Hopefully, just the mere act of forcing myself to paint so often and so consistently will naturally improve my abilities so that at some point, I'll be able to exceed table top quality while still maintaining this blistering pace.
As the title to the post suggests, this miniature will be replacing the first sniper I painted up for my Veteran Squad. While I was fairly happy with the conversions I performed on the first sniper to make him fit the Cadian mold, once I got my hands on the two-piece sniper body from the Cadian Command Squad kit, I knew I had to use it in my Veteran Squad. Essentially, this new sniper is 100% from the Command Squad kit, but with one minor change - a head swap from the Empire Great Swords kit, I believe.
By the way, this miniature took me past midnight to finish up, which means I'll be adding a 6th caveat to my project - since I'm a night owl, a day for this project will be any time before I go to bed. So even if the clock passes midnight, thus signalling in a new day, as long as I'm still awake, I'll count the miniature I finish as being for the day previous. Yeesh! By the time I get through with this project, my addendums and amendments and codicils will be hundreds of page long, all leading up to the inevitable result - less miniatures for me to paint. Let's hope that doesn't happen!
Monday, February 22, 2010
76 - Bonus Post! Officer of the Fleet and Nob with Waaagh! Banner
Well, a quick post showing 2 miniatures I worked on prior to embarking on this insane 365 miniatures in 365 days project I've got going here. To the left, you'll see my converted Officer of the Fleet for my Cadian Command Squad. He was put together using the torso, head, arms and shoulder pads of a Tank Commander (I believe the Baneblade one), a holstered pistol from the Tactical Space Marines kit, a sword from a Bretonnian kit, and the legs of a standard Cadian Guardsman. Getting the legs to fit with the torso was the toughest part of this conversion. I had to carefully estimate how much of the legs would be showing from underneath the great coat as well as cut the legs off in a such a way as to fit the underside of the torso without the miniature looking weird and wobbly. I personally think the end result was pretty good. The paintjob was decent, if a bit messy and rushed in some parts, but overall, I think the model is a pretty close stand-in for the actual Officer of the Fleet miniature which Games Workshop sells.
To the right, we've got the Nob with a Waaagh! Banner. The banner was obviously a total conversion seeing as how none of the available plastic Ork sprues sold by GW has anything resembling a Waaagh! Banner as described in the Ork Codex. For the banner, I basically just piled on bit after bit until I felt the banner was sufficiently grand and that the model would support its weight without toppling over. I had originally wanted the Nob to actually hold the banner in one of his hands, but it was impossible to keep the model upright even after gluing a metal washer to the bottom of the base. So, what's in the banner? I believe the base banner is from the Warhammer Fantasy Orc Warboss kit. I then added the bull skull from the Boyz kit (or was it the Nobz kit?) along the top of the banner; glued the metal mask from a Black Orc kit over the bull skull; decorated the rest of the banner with odds and ends from the Vampire Counts Zombie kit (the dangling severed heads), skulls (both Orkish and human) from various other kits, and a Lizardmen snake icon to represent the Snakebite Clan. I'm very happy with the results. Personally, I think any Ork Warboss would be proud to have one of his Nobz carry something like this into battle. This is only the first of two Waaagh! Banners I've converted for my Ork army. Believe it or not, but the 2nd banner is even more elaborate.